Friday, September 7, 2018

Fixing up the action

                      Hide Glue is used to fix most of the wooden or felt parts of a piano.
                 I pulled the action out to see if there was anything that needed attention.
             The Hammer rail felt needs replacing and  some broken cords that needed to be fix.


There were 4 places that had needed news cords to hold down the whippen


Using the hide glue and some cord (similar in size to the old one) that I found lying around, I glued the new cord to the action, let it dry and then pushed the metal hook under the looped cord.


And then the old back check needed to be scraped off and the new one glued on.


The next post will be about changing the strings and taking the dampers off.
Thanks for reading


Back Check

            Much of the leather on the back checks were fraying and rotting off.


Before we can fix this we must make some glue...
So I made a trip to walmart and bought some raw hide dog bones.
You first soak the bones for a while until they're soft. Then using a sharp knife cut the hide into smaller pieces. Put the pieces of hide back into the crockpot and fill with water just above
the hide.( In this picture there is a little too much water in the pot.)
Let this cook on high until the hide becomes dissolved and becomes one with the water.


You can test it by putting a little glue between your thumb and index finger 
and it should stick a bit as you pull them apart.
At this point if you wish to use it that day you can cook it down till its thick and sticky.
But if your making a big batch and wish to preserve it, this is the next step.
 Pour the glue in a pan to let the liquid turn to gel.


It will gel up in about twelve hours.
Once it's gelled you can scoop out the whole piece, then cut it into stips and subcut into cubes.


I used a fan on to help dry out the glue. Every two hours or so rub your hand over the cubes to turn them over. Do this for a day or two till the cubes are hard and dehydrated.


You are finished.  I stored these in a ziploc until ready to use.

Over the next month I had found a cheap small crock pot from the thrift store that I could dedicate to making glue. So when I was ready I could take the cubes of glue, put some extra water with it and heat it up again.  
Here's a video of what the glue looked like and how it worked.

Blogspot is not letting me put the video on but I was able to upload it to Youtube.
Here is the link.


Friday, July 27, 2018

The Key Frame

    Next on the Piano Project, After sliding the action out of the piano I unscrewed the top of the action and took it off the key frame.   The keys pull right off. Underneath are the felt punchings, which all needed to be replaced.    You will notice on the floor to the left and below the Key frame I'm working on, is the action sitting on the floor, ( I failed to get a photo of taking the two apart)


What the Key frame looked like after it was cleaned and had new paper and felt punchings

Note: the Back rail cloth ( the grey felt along the back side of the key frame) will have to be replaced. In order to do that I will have to make some hide glue,
Which I will tell you all about in the next post.

Monday, July 23, 2018

Juicer restoration

 Also wanted to show y'all another project my Dad helped me with.
A few months back my sisters, some friends and I went antiquing and thrift store shopping. We have a huge antique mall downtown and my friend and I found this old juicer in the back of the store. Any kind of machine or gadget I find very fascinating no matter how simplistic it may be.  My friend convinced me to get it, ( she would have bought it if I hadn't). 
Anyway this is what is looked like when I brought it home.


The original paint was already half gone. I peeled away the loose pieces of paint that were hanging on it, but the rest definitely needed something to help peel it off.
We went to Lowes and got the strongest Epoxy we could find.
and come to find out.....it works very well. ( Though I will tell you it burns if you get it on you)
Most of the paint came off after one coat.   We had to put a little more epoxy on a few stubborn spots.
It looked like this after we washed and dried it off.

We used 'bar keepers friend' to clean the crown of the Juice O Mat. It still wasn't as shiny as I wanted it to be. My Dad then bought the 'Mother's' metal polish which worked extraordinarily well.
This is the spray paint we used for the bottom half of the juicer.  Though we are aiming to restore the juicer I had to pick a brighter color than the original. 
Well after weeks of Buffing the metal and Putting 4 coats of paint on the juicer, 
Here is the finished project


Pulling Piano Action Out

The next step with the Piano is to start taking it apart.
Originally I had thought that grand pianos would be hard to work with,
It definitely seemed more intimidating .
Also I only, at this point, had tuned upright pianos. So not sure how to handle the grand piano I had to pull out a couple of piano repair books and found out that the action just slides right out of the frame.

First unscrewing the hinges on the side of the Fall board.
 Next unscrew the cheek blocks on either side of the keys.
                                                
Then there is the Key slip.  It had several screws across the front of the piano

 The last screw! (Well......At least to take the action out) 

 It is always a good idea to label your screws.   :)

 My youngest sister ( who has been taking a lot of these pictures for me) was kind enough to help me pull out the action and set it on the table to work on.


Well there is the process of taking out the action . Can't wait to show y'all the next step.
Thanks for reading

Saturday, July 7, 2018

Long Awaited Quilt to Long Arm

This quilt top has been hanging in the closet for almost two years now.  There are a few quilts I have bumped ahead to finish, knowing this one would probably take two days on the Longarm. The shop were I work has a long arm which I can use on any day off. 
So anyway, since we had the week of  the 4th of July off, I went in Monday and started.
  Hopefully these pictures illustrate well the steps to take in quilting your quilt top.
First the quilt back is pinned on, It is always best to have your backing as well as your batting 3-4 inches larger than the quilt top. I'll then roll the backing back and fourth on the rolls to get the backing to stretch evenly, ending with the backing on the front roller.
Next take the batting and spread it out over the backing. Baste a straight line across the top of the batting.
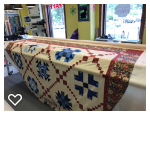
Then lay the quilt top on the batting, lining it up with the previous basting line.
Now you are ready to quilt!
I wanted to custom quilt this instead of quilting an allover design. When I got to the Blue squares I forgot I needed a Circle guide to do the design I had drawn up. The lid too my sandwich container was perfect.


It might be hard to see but this is how the design came out
Almost finished.....
Here's taking it off the long arm.
Now it just needs to be squared up.
Here's the finished project!!

Also, here is the scrambled mess I started out with. My boss had encouraged me, when I first started long arming, to draw out designs before it is taken to the longarm. 
 If anyone is new to long arming and has any questions feel free to ask. I'll answer to the best of my knowledge. 
Thank you for reading this post.


Wednesday, July 4, 2018

Piano photos

Here are a few photos of the piano.


This is one I tried sending in the last post.
Technology is definatly not my area of expertise. My mom has been very patient
with me in showing me how to put together a blog.  Back to the piano...
 This photo is of the serial number.
It almost seemd like a treasure hunt looking for this sticker. 
I finally found it at the far end underneath the key board.
This sticker makes it possible to find out when it was made.
The Pierce Piano Atlas is a book I would recomend to anybody pursuing there interests in pianos. They have quite a list of Piano companies, their history, and other valuable information.
After looking up the serial number, It turns out that the piano was made between 1930 and 1931.
Later, when taking out the keys to clean them, it only was confirmed with one of the keys having 1931 etched into the wood.

This damage on the side will be a little bit of work. My Dad and I have been discussing how we will tackle this one. I might see a professional woodworker for this. We'll see... 
Well, these are a few pictures of the piano as I have recieved it. The next post will be taking the piano apart.